Working with article import in a Product price campaign (price campaign)
Key features
- Use article import to build the product selection for a product price campaign
- Apply many different discount prices or percentages across products in one campaign
- Identify products by product ID or article number
Quick guide
- Prepare an Excel file with at least a product ID or article number column.
- In a product price campaign, go to Product selection and open the article import.
- Set the ID type, ID column number, and other file options.
- Upload the file and click Save selection.
Article import is an effective way to build your product selection when creating a product price campaign. It makes it easy to manage many different discount prices or percentages on products in the same campaign. To create new products via import, use the import tool instead.
Prepare the file
To run an article import you need an Excel file. If all products in the campaign share the same discount (the percentage set in step 1 when you create the campaign), the file only needs a column with the product's Merchant Center ID or article number.
To set specific campaign prices or percentages per product, add a column for it (see Set specific discount prices or percentages below).
Article import settings
The article import is in the Product selection step when you create your campaign. Set the following options:
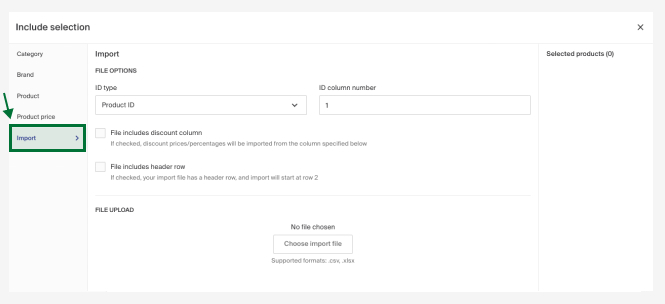
| Option | Description |
|---|---|
| ID type | Whether the file identifies products by product ID (Merchant Center) or article number. |
| ID column number | Which column the ID or article number is in. |
| File includes discount column | The file contains a column with specific campaign prices or percentages per product (see below). |
| File includes header row | The file has a first header row. |
When you upload the file, matching products appear under Selected Products on the right. Click Save selection.
Set specific discount prices or percentages
When you create a price campaign, you set the campaign's discount percentage in step 1 (Settings). You can override this with specific percentages in the product selection list, either manually in the list or via your import file.
To do this with an article import:
- Add a column to the import file containing either the discount price or the percentage to discount. A number like 150 is set as a campaign price; a percentage is set as the discount %.
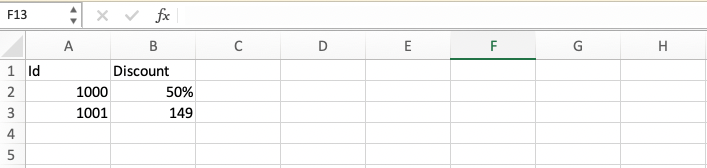
- Check File includes discount column and state which column the discount is in. In the example file above, the column number is 2.
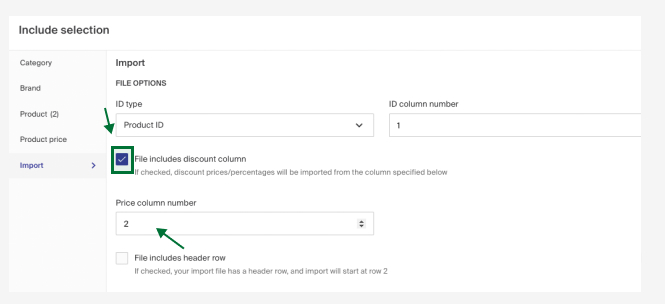
- If the file has a header row, check File includes header row. The example file above has a header row, with the column names Id and Discount.
- Under file upload, choose your file and upload it.
- Click Save selection at the bottom right.
In the Product selection list, the imported products show the discount applied.
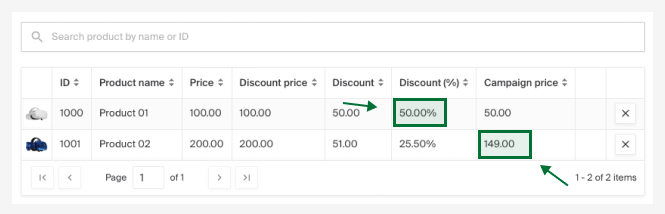
Click Save Campaign to save.