Create campaign pages
Key features
- Show a campaign's products on a dedicated campaign page
- Landing page created directly on the campaign, with filtering, sorting, and pagination
- Stand-alone CMS page with full content flexibility using the Product list widget
Quick guide
- For a quick page, create a landing page directly on the campaign.
- For a custom page, create a stand-alone page in Content (CMS) > Pages and add a Product list widget.
Products in one or more campaigns are shown in the store as normal in the categories they belong to. Depending on the campaign type, the products can be distinguished in different ways, such as badges or discount prices. To collect and show a campaign and its products on a campaign page, there are two ways:
| Option | Description |
|---|---|
| Landing page directly on campaign | A page created directly on a campaign. It lists the products included in the campaign and has the same base functions as a category listing page, including filtering, sorting, and pagination. |
| Stand-alone page (Page) in the CMS | A page with full flexibility to work with content and create a living campaign page. Products can be shown and listed in many ways with the Product list widget. |
Landing page directly on campaign
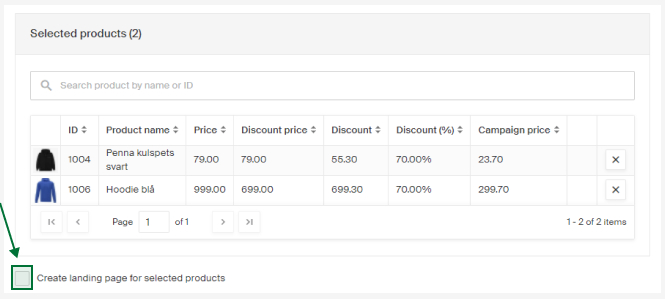
On the campaign, click Create landing page for selected products under the selected products list.
Enter the page's title, which forms the URL. You can also add a descriptive text.
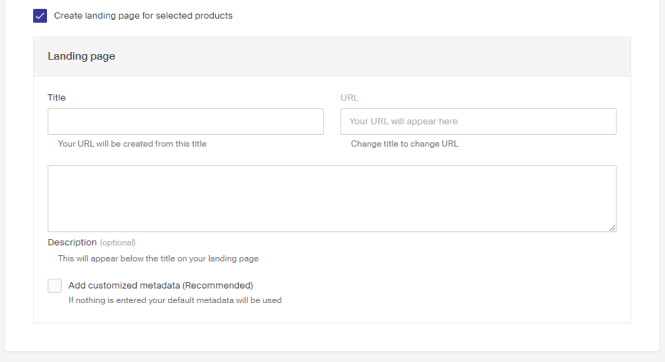
To add custom metadata, click Add customized metadata (Recommended) and enter title, keywords, and description. If nothing is added, the store's default metadata is used.
The landing page is reached in the store via the URL created when the campaign is saved and set as active.
To remove the landing page but keep the campaign, clear the Create landing page for selected products checkbox and save the campaign again.
Stand-alone page (Page) in the CMS
Under pages in the CMS you create stand-alone content pages, such as info pages or campaign pages. To create one, go to Content (CMS) > Pages and click Create new stand-alone page.
A page is always in draft status when created, so you can work on the content without it being public, then publish it when ready, either directly or scheduled.
Fill in the fields, then start building the content:
| Field | Description |
|---|---|
| Name | Internal only, shown in listings in Merchant Center. |
| Title | Forms the page URL. If you enter autumnoffer3for2, the page link becomes www.yourstorename.se/autumnoffer3for2. |
| Collection content | The content of the page. You have full flexibility to build the campaign page with the different widgets. See the Content documentation for how to work with the CMS and widgets. |
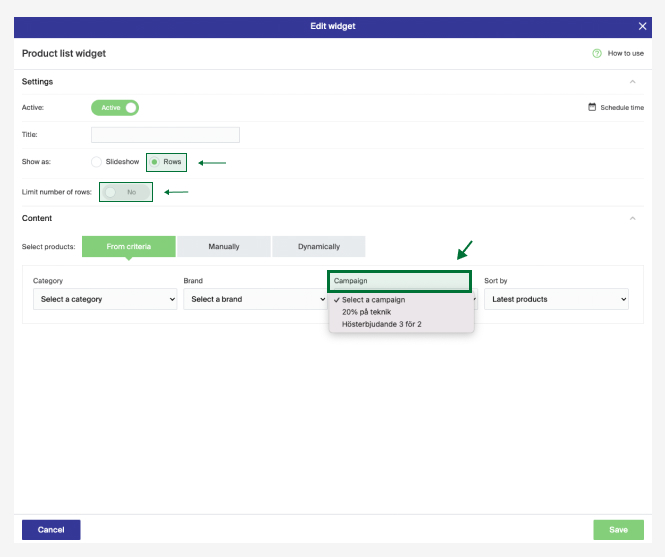
To show the products included in the campaign, use the Product list widget with these settings so all products are retrieved:
- Show as: Rows
- Limit number of rows: No
With these settings, products in the campaign are retrieved, and a Load more button is shown in listings if the campaign includes many products. Choose which campaign the products are retrieved from in the Campaign dropdown, which lists the other created and active campaigns.
Publishing the campaign page
To publish directly, click Save and Publish. To schedule publishing, set it under Publish settings.

Set the page as Active and choose the date and time you want it published under Schedule publish. You can also set an end date when the page will be taken down.

When a date and time are set, the time is shown as above. The page is not yet live, shown by the grayed-out and crossed-out visibility icon.
When you are done with the publish settings, click Save and Publish.